

Chocolate Peanut Butter Snickers Pie

General Comments:
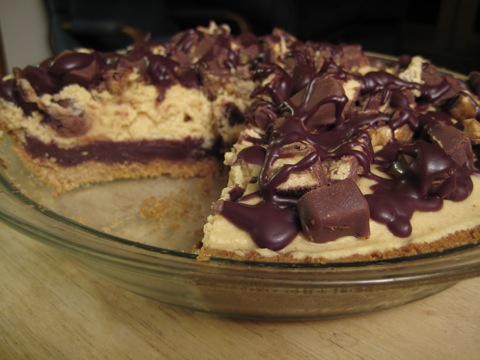
This pie combines my favorite candy bar with chocolate ganache and peanut butter mousse. What do you think my reaction was upon stumbling across this recipe? If you guessed something along the lines of “Holy crap, I must make this, and I must make it soon,” then you’d be absolutely correct. So, I made it and it was AWESOME.
While it does require making a few different components and assembling them, the overall difficulty level of the pie is pretty reasonable and the ingredients are easily obtained. One thing that immediately comes to mind when I think back on making this particular pie was the discovery that I will likely never buy a store-bought graham cracker crust ever again. Making the crust was super easy (assuming you have a food processor) and in my opinion the flavor and texture was way better than anything you could buy pre-made. Chalk up one excellent discovery.
In terms of the overall taste experience, the chocolate ganache bottom layer and the peanut butter mousse topping fit together rather well. However, I think I personally would have like the peanut butter flavor of the mousse to be a bit stronger. Of course, when you’re also chewing on chunks of snickers that have been sprinkled on top, you don’t necessarily mind the mildness of the mousse.
In terms of storing and serving the pie, the original recipe said that while it was intended to be stored in the refrigerator, putting it the freezer turns it into a sort of ice-cream-like pie, which can give the consumer a different experience if you choose to go that route. Keep in mind, though, that if you decide freeze it, you’ll want to let it sit on the counter for 10-15 minutes to soften up a bit before you try to serve it. I tried eating it both ways and didn’t have a strong preference either way.
Baker’s notes:
Spreading the graham cracker crust evenly over the pie pan was probably the trickiest part about this recipe. The trick is to just be patient and work it around the pan until you manage to get pretty even coverage. Don’t fret too much though, it’s unlikely that anyone will notice that the crust is a little thin in some places when they are distracted by the chocolate-peanut-butter-snickery goodness.
Recipe:
Crust Ingredients:
7 graham crackers, coarsely broken (I used Honey Grahams)
4 tablespoons (1/2 stick) unsalted butter, melted
2 tablespoons sugar
Chocolate Ganache Ingredients:
1 and 1/3 cups semisweet chocolate chips
2/3 cup chilled whipping cream
2 tablespoons light corn syrup
1 teaspoon vanilla extract
Peanut Butter Mousse Ingredients:
1 and 3/4 cups chilled whipping cream, divided
1 cup peanut butter chips
2 tablespoons creamy peanut butter
1 teaspoon vanilla extract
2 tablespoons sugar
Topping Ingredients:
1 11.5 ounce bag of mini Snickers candy bars, coarsely chopped (this is likely WAY TOO MANY, I only used ~2/3 of the bag)
Leftover ganache topping
Crust Directions:
- Preheat the oven to 350 degrees.
- Spray a 9-inch glass pie pan with cooking spray.
- Using your food processor, pulse the graham crackers until coarse crumbs form.
- Add the melted butter and 2 tablespoons of the sugar, and pulse until the mixture resembles moist sand.
- Using your fingers, press the crumb mixture into the pie pan.
- Bake until lightly browned, about 12-15 minutes. Set aside to cool.
Chocolate Ganache Directions:
- In a large microwave-safe bowl, combine the chocolate chips, 2/3 cup whipping cream, corn syrup, and 1 teaspoon of vanilla for about 3 minutes, whisking occasionally to smooth out the chocolate.
- Spread the chocolate (don’t use all of it, keep some extra for the leftover chocolate ganache drizzle) over the bottom of the crust and smooth with a rubber spatula. Freeze the pie crust for about 10 minutes to harden the chocolate.
Peanut Butter Mousse Directions:
- In a separate microwave-safe bowl, microwave the peanut butter chips and 3/4 cup whipping cream at 15-second intervals, stirring occasionally until the chips soften.
- Once the chips have melted, whisk in the peanut butter and 1 teaspoon vanilla extract. Set aside to let cool, about 10-15 minutes.
- In a separate bowl, beat the remaining 1 cup of whipping cream and 2 tablespoons of sugar until thickened “but not yet holding peaks”
- Gently fold in the peanut butter mixture into the whipped cream.
- Pour and spread the peanut butter mousse over the prepared crust, spreading gently with a rubber spatula. You may end up with some left over.
- Freeze or chill the mousse until firmed, about 10 minutes.
Topping Directions:
- Once firm, top with the chopped Snickers pieces and drizzle with re-heated leftover chocolate ganache.
Credit: Original recipe can be found here.
Chocolate Chip Banana Bread
As you can see, there’s no picture for this one. Sorry about that. While the end product was delicious, it just didn’t scream “take a picture!”. Next time I make this recipe I’ll try to get a decent shot of it, but for now you’ll have to trust me on words alone.
As with most banana breads, preparation is really straightforward. You can basically whip this up and have it baking in the oven in 10-15 minutes. The end result is probably one of the more moist banana breads I’ve had, owing to the addition of sour cream. I thought the flavor was good and basically exactly what I wanted out of a banana bread. The original recipe called for nuts, but I’m not a huge fan of nuts in banana bread and so I opted for chocolate chips instead, I find this to be a vast improvement.
Baker’s notes:
The loaf fell kind of flat after it sat out to cool. I’m not sure why exactly this was, but I might try tweaking the recipe a bit next time to see if I can find a way to keep the loaf nice and puffed up. My current thought is that it might be an altitude issue.
Recipe:
Ingredients:
1/2 cup butter, melted
1 cup white sugar
2 eggs
1 teaspoon vanilla extract
1 1/2 cups all-purpose flour
1 teaspoon baking soda
1/2 teaspoon salt
1/2 cup sour cream
1 cup chocolate chips (you can alway bump this up or down depending on your love for chocolate chips)
2 medium bananas, mashed
Directions:
- Preheat oven to 350 degrees F (175 degrees C). Grease a 9x5 inch loaf pan.
- In a large bowl, stir together the melted butter and sugar. Add the eggs and vanilla, mix well. Combine the flour, baking soda and salt, stir into the butter mixture until smooth. Finally, fold in the sour cream, chocolate chips, and bananas. Spread evenly into the prepared pan.
- Bake at 350 degrees F (175 degrees C) for 60 minutes (though I recommend starting to check it around 50 minutes), or until a toothpick inserted into the center of the loaf comes out clean. Cool loaf in the pan for 10 minutes before removing to a wire rack to cool completely.
Credit: Altered version of this recipe.
Honey Cinnamon Pistachio Baklava
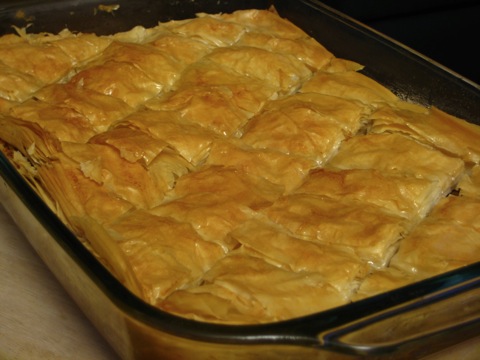
Out of pan:
General Comments:
“Amazing.”
That was the general reaction of those who got a chance to try a bit of this baklava. This recipe received some of the most positive feedback out of everything I’ve made, despite being completely devoid of chocolate (which has been a component of most everything I’ve done).
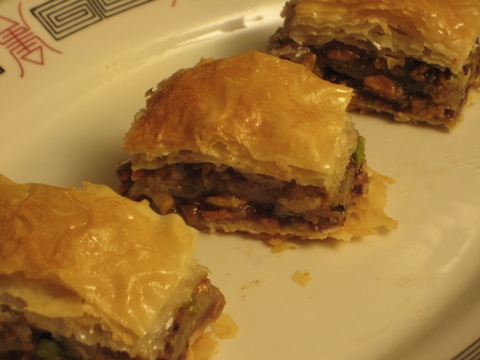
The cinnamon component was strong, but not overpowering. The pistachios were excellent as the nut component of the baklava, much better than any baklava I’ve had made with other nuts. Honestly, if I ever have the motivation to make baklava again, there is little chance I will test out any other recipes unless I’m specifically seeking to expand my baklava making repertoire. It was that good.
Baker’s notes:
For a very brief moment, I considered trying to make the phyllo dough myself. Then I looked up some recipes and read the directions and realized that it probably wouldn’t be good for my mental health if I went down that path, at least not yet. As it was, simply working with the store-bought phyllo dough brought forth a fair number of expletives during the assembly process. So, be prepared to exercise some patience with this one and keep in mind that each individual phyllo dough layer need not be perfect -- it simply won’t matter in the end.
A somewhat nit-picky note is that I think I could have chopped up the pistachios into slightly smaller chunks as some of them were still relatively large. This particular detail is probably a personal preference type of thing.
Recipe:
Ingredients:
2 cups plus 8 tablespoons sugar, divided
2/3 cup honey
1 cup water
2 cinnamon sticks
12 ounces shelled pistachios, toasted (scant 3 cups)
2 teaspoons ground cinnamon
1 cup (2 sticks) unsalted butter, melted
18 14×9-inch sheets fresh phyllo pastry or frozen, thawed (from one 16-ounce package)
Directions:
- Simmer 2 cups sugar, honey, water and cinnamon sticks in saucepan over medium heat, stirring to dissolve sugar. Boil over medium heat until reduced to approximately 2 cups, about 15 minutes. Cool syrup.
- Place nuts and 2 tablespoons sugar in processor. Using on/off turns, process until most of nuts are finely ground (the largest pieces should be the size of small peas). Mix nuts, 6 tablespoons sugar, and cinnamon in medium bowl.
- Preheat oven to 350°F. Brush 13x9x2-inch glass baking dish with some of melted butter. Place 1 phyllo sheet folded over on bottom of dish. Brush lightly with melted butter. Repeat 5 more times with phyllo and melted butter. Sprinkle half of pistachio mixture (about 1 1/2 cups) evenly over phyllo. Place 1 phyllo sheet (folded over) over nuts; brush lightly with butter. Repeat 5 more times with phyllo sheets and melted butter. Sprinkle remaining pistachio mixture evenly over. Place 1 phyllo sheet atop nuts folded in half; brush with butter. Repeat 5 more times with phyllo sheets and melted butter.
- Using sharp knife, cut diagonally through top phyllo layer from top left corner to bottom right corner. Cut top layer of phyllo into 1-inch-wide rows parallel to both sides of first cut. Turn pan and cut rows about 2 1/4 inches wide, forming diamond pattern.
- Bake baklava until golden brown and crisp, 50 to 55 minutes. Drizzle syrup evenly over hot baklava. Cool in pan on rack. Recut baklava along lines all the way through layers.
Credit: Followed this recipe.
Beeramisu
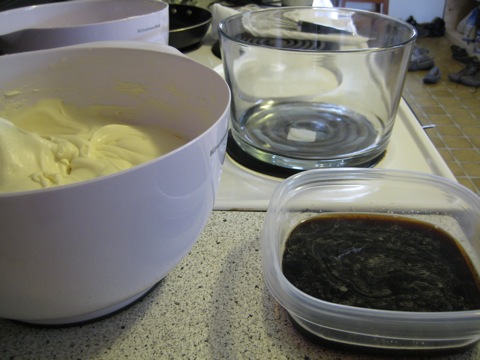
and ended like this:
General Comments:
Whoa.... it’s been a while since I posted. Oops. Despite my lack of posts, I’ve definitely still been baking and I’m going to try and bust a few out right now. I’m gonna get things rolling with a pretty quick one. Here goes.
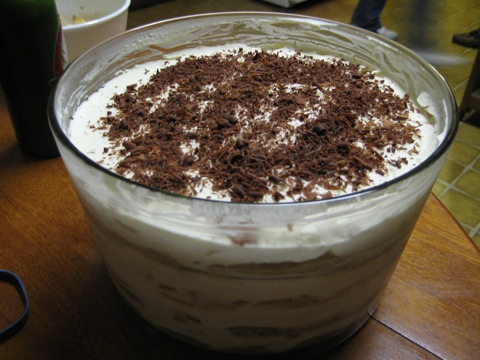
Beer + Tiramisu = Beeramisu. This little treat was prepared as a congratulations to my friend Erin for completing the Boston Marathon and with a damn fast time. So, congrats to her. While this took me a bit longer to make than I envisioned, due mostly to the successive layering, it was a conceptually very simple recipe. However, it’s not something you can just whip together and dig into. You ideally need several hours of time for the whole thing to chill out (literally, it has to be refrigerated). This allows the ladyfingers to soak up all of the delicious booze-y liquids.
Despite needing to plan ahead to enjoy this delectable, I’d say it’s fairly worth it. After all, we’re talking about a dessert filled with Baileys irish cream and stout -- what else do you need to know to give it a shot?
Baker’s Notes:
On one of the layer’s I forgot to pour the Baileys over the ladyfingers, but it didn’t seem particularly noticeable. In fact, the Baileys comes through as a pretty dominate flavor and washes out a lot of the stout flavors. I’d consider reducing the Baileys content if I were to make it again.
I doubled this recipe to make sure I could have plenty of layers in my trifle bowl and so that I could make a second smaller container in addition to what you see in the picture. I mainly did this so that I could test out two different stouts and make sure that I could feed a good number of people.
Recipe:
Ingredients:
1 pound mascarpone, softened
3/4 cup granulated sugar
3/4 cup heavy whipping cream
1/2 cup plus 2 tablespoons plus 1/2 cup Irish Cream such as Bailey's or Carolan's, divided
8 ounces Guinness (or some other favorite stout, I used Sante Fe Brewing’s Imperial Java Stout for the trifle bowl and Guinness for the second dish)
36 savoiardi (Italian ladyfingers, I used these ones from Amazon.com)
Small bar good-quality chocolate, for shaving
Directions:
- Combine the mascarpone and sugar in a medium bowl, stir vigorously to dissolve sugar. Place whipping cream and 2 tablespoons Irish Cream in a stand mixer fitted with a whisk attachment or, if you’re like me and don’t yet have a stand mixer, you can use a hand mixer, but the whisk attachment is crucial. Whip on high until stiff peaks form, 2-3 minutes. Gently fold whipped cream into mascarpone.
- Pour Guinness into a shallow bowl. One at a time, dip ladyfingers into Guinness on each side. Don't soak them: counting to one on each side will provide all the stout flavor and moisture you'll need. Place in a tight single layer in dish, breaking them into pieces as necessary. Drizzle 1/4 cup Irish Cream over entire layer. Pour about 1-2 cups of the mascarpone mixture over ladyfingers until covered, spreading smooth with a spatula. Grate a layer of chocolate shavings over the top with a microplane or a vegetable peeler (I only bothered putting the chocolate shaving in every other layer, but I wanted to save time and was running out of patience)
- Repeat process with another layer. Refrigerate for at least 12 hours or overnight before serving.
Credit: More or less followed this recipe.
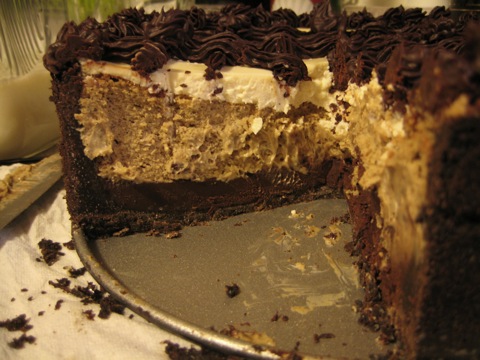
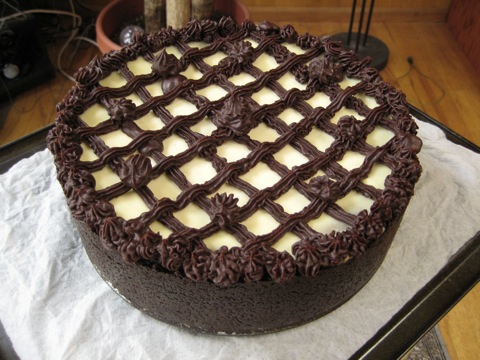
Cappuccino Fudge Cheesecake
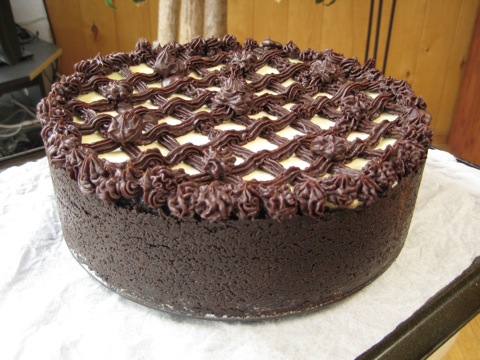
Inside:
General Comments:
As I dove head first into baking, one of my earliest purchases in my attempt to bolster my baking equipment arsenal was a springform pan. I vowed to give cheesecake a shot and then... didn’t get around to it for a while. A few weeks back (jeez, I am bad at posting my baking endeavors in a timely manner), I finally managed to bake my first cheesecake. Of course, it would have been foolish of me to start with a relatively simple recipe, so I ultimately committed myself to this one. That’s right, crust + 3 separate layers + a piped ganache topping. First cheesecake, first piped frosting, and first time I had to seriously question whether or not something this involved was worth the effort. In talking to my friend Erin about the amount of time that went into this particular baking creation, she created and shared the following, rather apt, graph:

While you may wish to debate the appropriate units for deliciosity (I think the ones Erin came up with work rather well), I’m guessing many of us would agree with the basic message -- if something takes a long time to make, it better be pretty tasty. Even then, we all hit a point at which it’s just not worth it. This cheesecake floated right around the vertical line in the graph. Ultimately, I decided to cross my fingers and hope the outcome would be worth the time commitment.
So, was it? Well, I think after the number of slices I managed to serve (its unwise to try to eat too much of this particular cheesecake in one sitting) and the number of people that tried it with strong positive feedback (one person said they’d happily pay 6 bucks for a slice of it at a restaurant), I’d say it was. The espresso flavor was strong without being overwhelming, the kahlua fudge/ganache layer + frosting was scrumptious, and the cookie crust, though rather difficult to cut with a fork, was tasty. So... if you want a cheesecake that is both pleasing to the eyes and the tastebuds and you’ve got ample time, I’d recommend giving it a shot.
Baker’s Notes:
First and foremost, this cheesecake requires some time. You need to chill the bottom ganache layer before you can add the cheesecake layer, then you add the cheesecake layer and bake it, then let it sit for a bit before you can add and bake the final layer, then you need to get the whole thing cooled down before you can add the ganache topping, and then.... you need to let it sit so that the ganache topping can firm up and the flavors can mingle. Ideally you should make it and let it sit over night before digging in. You’ve been warned.
Second, the cookie crust layer has a pretty substantial amount of chopped chocolate in it and when it was baked and chilled, it turned into a very hard chocolate + cookie stone-like crust. It tasted awesome, but was difficult to cut through with the side of a fork, particularly at the corner. Since the corners were the most difficult (you just had to abandon the fork and pick it up and eat it), I think its rather important to try to make sure you do a good job of spreading out the crust when you line the springform pan and try very hard to keep the corners thin.
Third, as I mentioned, this was the first time in which I had to pipe a decorative topping onto something. When I first put the ganache into the piping bag it was too firm and wouldn’t flow through the piping tip. Since I already had all the ganache in the piping bag (which had already proved to be a messy process), I tried to gently warm the ganache using the heat from the oven vent burner until I could actually work with it. This did the trick, but the consistency of the ganache in the pipping bag was not consistent and led to unpredictable ganache flow. Unpredictable flow led to some ugly parts in the decorative topping, which I tried to just accept, but still drove me a bit crazy (I might just be a little too OCD when it comes to stuff like that -- it still tastes the same, right?). My recommendation is that if you left the ganache topping sit for a long while before you pipe it on to the cheesecake, warm it up (very lightly) a bit first to make sure it will flow the way you want.
Recipe:
Crust Ingredients
1 9-ounce box chocolate wafer cookies or 9 ounces of homemade chocolate wafers
6 ounces bittersweet or semisweet chocolate, coarsely chopped
1/2 cup (packed) dark brown sugar
1/8 teaspoon ground nutmeg
7 tablespoons hot melted unsalted butter
Ganache Ingredients
1 1/2 cups heavy or whipping cream
20 ounces bittersweet or semisweet chocolate, chopped
1/4 cup Kahlúa or other coffee-flavored liqueur
Filling Ingredients
3 8-ounce packages cream cheese, room temperature
1 cup sugar
1 1/2 tablespoons all purpose flour
1 1/2 tablespoons dark rum
1 1/2 tablespoons instant espresso powder or coffee crystals
1 1/2 tablespoons ground whole espresso coffee beans (medium-coarse grind)
2 teaspoons vanilla extract
1 1/2 teaspoons mild-flavored (light) molasses
3 large eggs
Topping Ingredients
1 1/2 cups sour cream
1/3 cup sugar
2 teaspoons vanilla extract
Directions
- Make crust: Finely grind cookies, chopped chocolate, brown sugar, and nutmeg in processor. Add butter and process until crumbs begin to stick together, scraping down bowl occasionally, about 1 minute. Transfer crumbs to 9-inch-diameter springform pan with 3-inch-high sides. Wrap plastic wrap around fingers and press crumb mixture firmly up sides to within 1/2 inch of top edge, then over bottom of pan.
- Make ganache: Bring cream to simmer in large saucepan. Remove from heat; add chocolate and Kahlúa. Whisk until chocolate is melted and ganache is smooth. Pour 2 cups ganache over bottom of crust. Freeze until ganache layer is firm, about 30 minutes. Reserve remaining ganache; cover and let stand at room temperature to use later for decorating.
- Make filling: Position rack in middle of oven and preheat to 350°F. Using electric mixer, beat cream cheese and sugar in large bowl until blended. Scrape down bowl, making sure you get to the bottom, where little pockets of unmixed cream cheese love to hide. Beat in flour. Stir rum, espresso powder, ground coffee, vanilla, and molasses in small bowl until instant coffee dissolves; beat into cream cheese mixture. Beat in eggs one at a time, scraping down sides of bowl between each addition.
- Pour filling over cold ganache in crust — it will go nearly all of the way to the top, don’t panic. Place cheesecake on rimmed baking sheet. Bake until top is brown, puffed and cracked at edges, and the center two inches moves only slightly when pan is gently shaken, about one hour. Transfer cheesecake to rack. Cool 15 minutes while preparing topping (top of cheesecake will fall slightly, making room for topping). Maintain oven temperature.
- Make topping: Whisk sour cream, sugar, and vanilla in medium bowl to blend. Pour topping over hot cheesecake, spreading to cover filling completely. Bake until topping is set, about 10 to 15 minutes. Transfer cheesecake to rack. Refrigerate hot cheesecake on rack until cool, about three hours.
- Run small sharp knife between crust and pan sides to loosen cake; release pan sides. Transfer cheesecake to platter. Spoon reserved ganache into pastry bag fitted with small star tip. Decorate with ganache as you see fit.
Credit: Original recipe is located here.
Cookies and Cream Cookies
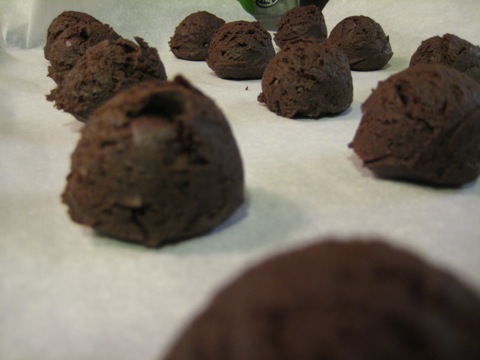
After:

General Comments:
These cookies were baked for the purpose of putting delicious treats in the bellies of a friend’s thesis committee on his defense day (he’s a doctor now!). Chocolate seemed like a good choice, so why not chocolate in three forms? Oreos? Check. Cocoa Powder? Check. Chocolate Chips? Check. Oh and milk is strongly recommended as an accompaniment. Overall, these cookies aren’t any more complicated than a standard batch of cookies with the exception of needing a food processor to blend up the Oreos. Is making these cookies a better use for Oreos than just eating them on their own? You be the judge.
Baker’s Notes:
First, the recipe didn’t specify whether to use salted or unsalted butter. I turned to the wise Internet for some sage advice, but there didn’t seem to be a clear consensus on the default butter option when you’re not explicitly told which to use. As a result, I basically flipped a coin and went ahead and used salted butter. In retrospect, I should have chosen unsalted. While there was not an overwhelming saltiness present, it was definitely noticeable. In the future, I think I’ll just default to unsalted, especially if the recipe calls for salt in addition to butter. Lesson learned.
Second, while it wasn’t really a bad thing, I personally found the cookies to be a little crumbly -- though they didn’t taste particularly dry. I’m guessing this has to do with the fact that a substantial component of the batter is simply ground up Oreos crumbs, which aren’t going to inherently want to stick to each other. I should also note that I used Double Stuf Oreos instead of regular ones because, really, why wouldn’t I? I’m not sure what effect the extra “cream” component may have had.
Recipe:
Ingredients
2 sticks softened unsalted butter
1 cup granulated sugar
3/4 cup packed dark brown sugar (recipe originally called for light, but I just like dark better)
2 large eggs
1 tablespoon pure vanilla extract
1 3/4 cups all-purpose flour
1 teaspoon baking soda
1/2 teaspoon kosher salt
1 1/2 cups chocolate chips, I used Ghirardelli 60% cacao
1 cup cocoa powder
15 whole Double Stuf Oreo Cookies, finely ground
Directions
- Preheat oven to 350 degrees F and line a large baking sheet with parchment paper.
- With an electric mixer, beat butter and sugars until well combined. Add eggs and vanilla, beating until well combined.
- Place flour, baking soda, salt, cocoa powder, and Oreo crumbs into a large bowl. Mix together.
- Add dry ingredients to wet ingredients and mix until just combined.
- Fold in chocolate chips.
- With a medium cookie scoop, scoop dough onto prepared baking sheet, about 1 inch apart from each other. Bake for 9 to 11 minutes, until cooked through. Let cool on baking sheet for 5 minutes before transferring to a cooling rack.
Credit: Adapted/modified version of this recipe.
Oh, one last thing just for fun....

To be honest, I wish I had made all of the cookies like Mickey’s face. The Oreo I pressed into the center got nice and soft when baked and really added to the “cookies and cream” name of these cookies.
Teaser: Cappuccino Fudge Cheesecake
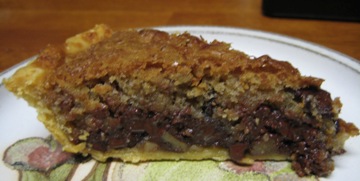
Chocolate Chip Cookie Pie
Before:
After:
General Comments:
This one is just about as amazing as it sounds -- a pie-cookie hybrid resulting in high levels of deliciosity. This was even easier than the chocolate espresso pecan pie (I used a store-bought crust again, but I didn’t have a choice, they came in a two pack!). I’d estimate total preparation time to be ~15 minutes if you’re not making the crust, ignoring the time necessary to warm the butter to room temperature.
Baker’s Notes:
1) At one point I considered omitting the nuts and either substituting in more chocolate chips or some other sort of ingredient because I’m generally anti-nut when it comes to cookies. However, I think the pecans actual play a key roll in the structural integrity of the pie and, in the context of a pie, the nuts fit right in.
2) If you decide to use a store-bought crust, make sure you end up with a volumetric capacity of 4 cups or you risk a situation in which your pie runneth over. Also, I put foil on the crust for the first half of the cooking time to prevent burning.
Recipe:
Ingredients:
1 9-inch pie crust (4-cup volume)
2 large eggs
1/2 cup all-purpose flour
1/2 cup granulated sugar
1/2 cup packed brown sugar
3/4 cup (1 1/2 sticks) butter, softened to room temperature
1 cup (6 ounces) semi-sweet or 60% cacao chocolate chips
1 cup chopped pecans
Directions:
- Preheat oven 325 degrees F.
- Beat eggs in large mixer bowl on high until foamy.
- Beat in flour, granulated sugar and brown sugar. Beat in butter.
- Stir in chips and nuts and spoon into pie shell.
- Bake for 55-60 minutes. Cool on wire rack. Serve warm.
Credit: Used the recipe located here, which supposedly first came from Nestle.
Chocolate Espresso Pecan Pie

General Comments:
So, I’m going to try and keep this post short and sweet (though I’m not sure I’m capable of such a thing) because I am back-logged on posting my baking conquests. Hopefully if I slam out a couple few posts, I can get back on track.
This pie was one of my earliest baking adventures. I stumbled across it while scanning through the recipes on use real butter -- which, by the way, produced by a Colorado local seeking to perfect high altitude baking. The title alone was enough to grab my attention: chocolate. espresso. pecan pie. Didn’t really have to think twice about this one. At any rate, this pie turned out great. For those of you who might normally shy away from pecan pie because its just “too sugary," I think you should give this one a shot -- assuming you like chocolate and espresso. To me, the bitterness of the chocolate and the espresso serves to balance out the standard sweetness of a traditional pecan pie. This is one of my creations that never made it into the office, but can you blame me? Pies are clearly too small to share with more than a handful of people -- maybe next time I’ll make two.
Baker’s Notes:
Not much to note here, the recipe was rather straightforward. However, because I was lazy and wanted to save time (and I wasn’t yet confident in my baking abilities), I used a store-bought crust by Pillsbury. It did the trick, but the crust was definitely the weakest part of the pie. Oh also, I was somewhat shocked by it, but you really do put the pecans in before the filling and they float to the top all on their own -- crazy!
Recipe:
Filling Ingredients:
3 oz (85g) unsweetened chocolate, coarsely chopped
2 oz (60g) unsalted butter
4 large eggs
1 cup (330g) light corn syrup
1 cup (225g) sugar
1/4 tsp (2g) kosher salt
2 tbsps (6g) instant espresso powder
1 tbsp hot water
2 tbsps (30g) coffee liqueur
2 cups (230g) pecans, lightly toasted, coarsely chopped
1/2 (60g) cup perfect pecan halves
Directions:
- Prepare your pre-brought pie crust (you’re so lazy) by following the instructions on the box.
- Melt chocolate and butter over gentle heat, stirring until smooth. Remove from heat and let cool.
- In a medium bowl, whisk together the eggs, corn syrup, sugar, and salt.
- Dissolve the instant espresso in 1 tbsp of hot water.
- Add the chocolate, espresso, and coffee liqueur to the egg mixture and whisk to blend.
- Sprinkle the chopped pecans into the pie shell and arrange the pecan halves along the edge of the pie, but on top of the pieces.
- Pour the filling over the center of the pie. If the pecan halves begin to bandy about, just position them where you want them by hand.
- Bake the pie until the filling puffs, about 45 to 55 minutes (I think it took mine somewhere around 50 minutes). Also, after about 25 minutes, I took the pie out and put a foil ring over the crust so as to prevent the crust from over cooking.
- Transfer to a rack and allow to cool completely.
- You can refrigerate the pie for several hours making it easier to serve.
Credit: Pretty much directly followed this recipe, but skipped the crust making part.
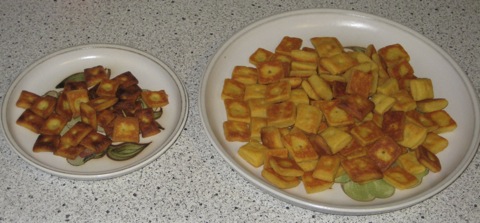
Cheddar Crackers

General Comments:
Do you like goldfish crackers? Cheez-its? How about making them at home? Yep, that’s right, homemade goldfish/cheez-its. I thought I’d try my hand at something savory, but also wanted something simple and quick because I was baking on a weeknight as I was going to be out of town on the weekend. That’s where these came in. Additionally, these crackers gave me the opportunity to use 3 new pieces of equipment: a food processor, a rolling pin, and a pastry scraper. On that note, my skills with a rolling pin could use some serious work. That aside... let’s talk food.
So I came across a recipe for cheddar crackers during the beginning of my descent in baking obsession and I tucked it away until I had the right equipment and the motivation. They looked simple to make and yet simultaneously something I could find myself eating and enjoying. However, the original recipe sounded a touch to boring for my taste, so I decided to make two batches -- one in which I just following the recipe, and one in which I got a little creative. The secret ingredient for the creative ones? Cholula. Bam. I wanted one of the batches to have something a little exciting going on, so I subbed out some of the water for cholula and added some cayenne pepper (I’ll be posting both versions below, the cholula ones are in the above picture). In the end, I much prefer the cholula ones because they’re more interesting, but the straight cheddar ones did taste freakishly similar to store bought cheddar crackers. In the future, I think I might use a stronger cheddar as I felt the cheese flavor could have been a bit more powerful.
One final comment is that I would have like the crackers to be crunchier, but on the other hand some people like the light fluffiness of them. In an attempt to step up the crunch factor in the plain cheddar ones, I broiled them all for a VERY SHORT amount of time (1-3 minutes). This did darken up the tops a bit and added some crunch, but not as much as I had hoped for. Also... got distracted briefly with the broiling for a fraction of them and they got a little on the burnt side (left side of the image below). Interestingly enough, the slightly burnt ones tasted more like cheez-its than goldfish...
Baker’s Notes:
1) The most time consuming part of this recipe was cutting the dough into cracker-sized pieces (which is why they then from triangles to squares -- less cuts). I was using my pastry scraper to cut them, but I think in the future I might use a pizza wheel to save time.
2) The original recipe suggested that the dough be rolled to 1/8 of an inch thick, but I think even thinner is better. Thicker pieces will tend to puff up quite a bit, so if you want really fluffy ones, leave it thick. I found that even when rolled to 1/16 of an inch, I got plenty of puff. You’ll also notice that in the plain cheddar batch, there are small dots in the center (reminiscent of real cheez-its). I used a chopstick to poke those dots in each cracker. This actually limited how much they puffed up and ultimate I thought led to better crackers -- both visually and crunch wise.
3) Unfortunately, the crunch seems to fade with time, even when stored in an airtight container -- I haven’t come up with a good remedy for this yet.
Recipe:
Cholula Cheddar Cracker Ingredients
1 cup all-purpose flour
3/4 tsp. salt
1/4 tsp. ground black pepper
1/4 tsp. ground cayenne pepper
4 Tbsp. cold unsalted butter, cut into small pieces
8 oz. grated cheddar cheese
2 Tbsp. Cholula hot sauce
1-2 Tbsp. water
Plain Cheddar Cracker Ingredients
1 cup all-purpose flour
3/4 tsp. salt
4 Tbsp. cold unsalted butter, cut into small pieces
8 oz. grated cheddar cheese
3-4 Tbsp. water
Directions
- In a food processor: Pulse the flour, salt and pepper, then add butter and pulse until the mixture resembles coarse meal. Add grated cheese a little at a time until the mixture again resembles coarse meal.
- Pulse in 3 to 4 tablespoons of water, one tablespoon at a time, until the dough forms into a ball. It will probably take a minute or so. (for the cholula crackers, added the 2 tablespoons of cholula first, then add 1-2 tablespoons of water)
- Remove, wrap in plastic, and chill for 20 minutes or up to 24 hours. I let one batch chill for ~90 minutes and the other overnight. By doing this, the butter has time to solidify and may make for puffier crackers. Keep in mind that you’ll likely have to let the dough warm up a bit before you can roll it, if you let it sit in the fridge over night.
- Roll the dough out to 1/16th to 1/8th-inch thickness.
- Using a knife, pastry scraper, or pizza wheel, cut 1 inch squares (or whatever shape suits you)
- Bake at 350° F for 15-20 minutes or until crackers are golden brown. Watch them after the 10 minute mark.
- Optional: If you want to try to brown the tops of the crackers more and potentially get them a bit crispier, broil them for 1-3 minutes, but watch them like a hawk.
Credit: Modified from this recipe.