

Mar 2011
Peanut Butter S'more Turnovers
Mar 29, 2011 20:59 Filed in: Pastries
General Comments:
These were super simple to make. Had I been feeling more ambitious, I probably would have tried to make the puff pastry myself, but instead I just used Pepperidge Farm puff pastry, which actually cooks up pretty nicely. Additionally, I would have preferred to use Fluff, but unfortunately I had to settle for marshmallow creme (some of you will understand the difference). I also did 6 of them with dark chocolate and 6 of them with milk chocolate. Feedback from coworkers seemed to suggest that it was entirely personal preference which determined the better option, so if you try these out, do whatever sounds good. My final comment is that the peanut butter can easily become the dominant flavor if you get carried away with how much you tuck away inside the pastry, but that’s only a problem if you don’t love peanut butter -- I happen to enjoy it thoroughly.
Baker’s Notes:
First, make sure to cut the small slits in the tops of the turnovers to allow steam to vent. I forgot to do so on the second batch of 6 and it resulted in a higher fraction of turnovers that ruptured and allowed some of the peanut butter to escape.
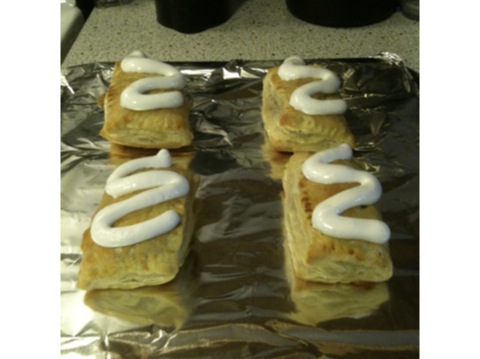
Second, if you don’t plan on serving and eating the turnovers right away, I suggest that you only apply the marshmallow creme at the time of serving. When I first applied the marshmallow it was plump and fluffy -- as can be seen in the picture. However, once I let the turnovers cool completely and put them in an airtight container, the marshmallow decided to liquify. When I returned to them the following morning, a large fraction of the marshmallow had run off. This left the turnovers with more of a marshmallow “glaze” than the nice topping that can be seen in the photo.
Recipe:
Prep work: Preheat over to 400 degrees. Line a baking sheet with parchment paper or lightly coat with non-stick cooking spray.
Ingredients
1 box Puff Pastry (2 sheets), thawed
3 whole graham crackers, gently broken into fourths
Small milk chocolate bars (Hershey’s .49 oz. bars work pretty well. If you use these, you’ll need 9)
½ cup creamy peanut butter
small bowl of water (for dampening the puff pastry)
1 egg whisked with 1 Tbsp. water (to make egg wash)
½ cup jarred Marshmallow Creme (or Fluff)
Directions
- Lay Puff Pastry on cutting board. Working with one sheet of Puff Pastry at a time, cut on three folds, creating 3 rectangles (about 3″ x 10″ each). Cut each 3 x 10 rectangle in half. You’ll have 6 pieces to work with for each sheet of Puff Pastry.
- Assemble turnovers: Lay graham cracker on 1/2 of each square, top with chocolate that has been cut down to match the length of the graham cracker. Scoop a scant 1 Tbsp. peanut butter on top of each chocolate bar. (If using the .49 oz Hershey’s bar, you’ll want to use 3 sections worth for each turnover)
- Working with one turnover at a time, wet edges of Puff Pastry and fold (over) in half to meet opposite edges. Gently push edges together to stick; use fork to seal edges together and create ridged pattern. Repeat with each turnover until all are sealed up. Gently move sealed turnovers to baking sheet with a small spatula. (At this point, the turnovers may be refrigerated for up to an hour before baking -- cover baking sheet with plastic wrap. When ready to bake, remove from refrigerator and continue with instructions).
- Brush turnovers lightly with egg wash, then use a sharp knife to cut two small slits into the top of each turnover.
- Bake 15 minutes, or until turnovers are puffed and golden. Remove from oven. Let cool for 5 minutes. Scoop marshmallow creme into a zip baggie (don’t zip). Microwave for 8 seconds to soften. Zip bag and snip a small piece off of the corner of the bag. Drizzle marshmallow onto the top of each turnover. Serve immediately.
Credit: Very slightly modified version of this recipe.
Comments
Kahlua Fudge Brownies
Mar 29, 2011 15:09 Filed in: Brownies
General Comments:
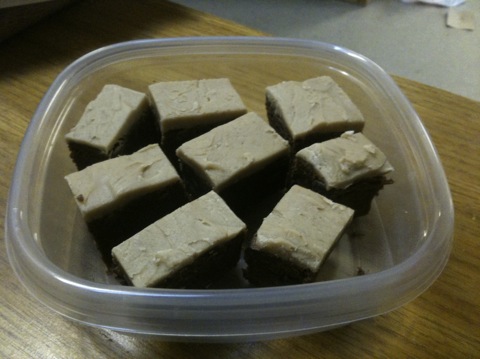
First, the picture does not do these brownies justice. I didn’t think to take any pictures during the baking process so this is a picture of a portion of the ones that I brought into share at work. These have been sitting the fridge the last couple days and I cut them into what I feel to be reasonable servings as these are DENSE and RICH. They dried out a little bit in the fridge, but not overly so and their amazing “fudgey”-ness has remained. Overall response from co-workers was positive, so we’ll mark this one as a success. (The density and fudge-like quality tended to surprise folks the most.)
Baker’s Notes:
First off, the recipe called for a 9”x 9” pan, but since I didn’t feel like making a journey to find one, I ended up using an 11” x 7” pan. I feel this resulted in the edges over-cooking slightly, but I simply cut off all the edges for serving purposes and put them in a container for the roommates to snack on -- no complaints there.
Second, once you’ve browned the butter for the icing, it would be wise to either let it cool a while or be prepared for extreme foaming/boil-over when you add the kahlua and whipping cream.
Recipe:
Prep work: Preheat the oven to 350 degrees. Line a 9” x 9” baking pan with foil and coat with non-stick cooking spray.
Brownie Ingredients
2½ cups all-purpose flour
½ tsp baking powder
1 tsp salt
1 cup unsalted butter
2 cups semi-sweet chocolate chips
1½ cups light brown sugar
2 large eggs
½ cup + 2 Tbsp. Kahlua (or another coffee liqueur), divided
~½ of a 12 oz. bag of 60% cacao chocolate chips
Brownie Directions
- In a medium bowl, sift flour, baking powder and salt; set aside.
- Set a heatproof bowl over a pan of simmering water (pan shouldn’t be touching the water). Place butter and chocolate chips in bowl and stir until melted and smooth. Alternatively, just pop it in the microwave and apply 20 seconds bursts until sufficiently melted. After melted, let cool a bit.
- In a large bowl with an electric mixer, mix sugar, eggs and 1/2 cup Kahlua. Pour in buttery chocolate mixture and beat until mixed well. Mix in dry ingredients and beat just until combined. Fold in 60% cacao chocolate chips.
- Pour/Spread brownie batter into prepared pan (it will be thick). Bake for 40 to 45 minutes, or until top cracks slightly and toothpick inserted in center comes out mostly clean (it might be slightly gooey on the bottom of the toothpick, that’s fine) Remove brownies from oven and immediately brush warm brownies with 2 Tbsp. of Kahlua. Let brownies cool completely. Optional: Refrigerate them briefly after they’ve cooled a bit.
Icing Ingredients
¼ cup butter (½ stick)
2 Tbs kahlua
1 Tbs whipping cream
2¼ cups powdered sugar (more or less)
Icing Directions
- Place butter in saucepan and heat until lightly browned.
- Remove from heat and add kahlua & whipping cream.
- Whisk in powdered sugar until you have the consistency that you desire (you should be looking for a thick, smooth icing that is still pourable).
- Pour on top of cooled brownies and spread to edges to cover completely. Refrigerate until set. Chilled brownies are easiest to cut… use a large, sharp knife, wipe clean after each cut, and you’ll get nice, clean cuts.
Credit: Modified slightly from this recipe.
Welcome!
Mar 29, 2011 14:49 Filed in: News & Updates
Howdy folks!
So... I started baking about a month and a half ago and now... I might be addicted to it. It started out as a means of treating myself to something tasty once a week and somehow things got out of hand. For those of you who know me, I don’t really do things half way -- I’m an all or nothing kind of guy.
At this point, I’m constantly in search of recipes for my next delicious delectable. As I find more and more recipes, I file them away -- waiting for the opportunity to try my hand. Since the internet is nearly limitless in the number of recipes it offers, I’ll never manage to do them all, but that won’t stop me from trying. This will hopefully serve a record of my attempt to “bake the internet”. You’ll see my triumphs, my failures, and everything in between. I’ll do my best to post the full recipes (with appropriate credit to their creators), pictures of the outcomes, and any tips and tricks I come across along the way.
I make no claims to maintain this site indefinitely, but, until it dies, maybe it’ll prove useful.